Tip
Owners can restrict repository creation permissions in an organization. For more information, see "Restricting repository creation in your organization."
Tip
You can also create a repository using the GitHub CLI. For more information, see "gh repo create" in the GitHub CLI documentation.
Creating a new repository from the web UI
-
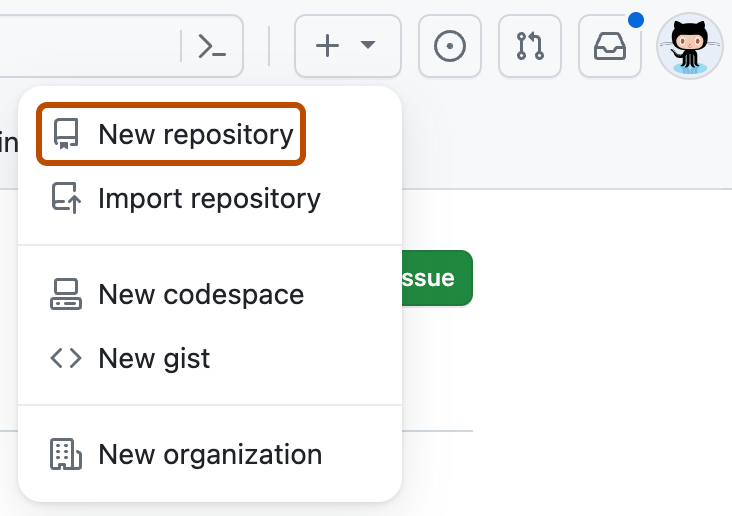
In the upper-right corner of any page, select , then click New repository.

-
Optionally, to create a repository with the directory structure and files of an existing repository, select the Choose a template dropdown menu and click a template repository. You'll see template repositories that are owned by you and organizations you're a member of or that you've used before. For more information, see "Creating a repository from a template."
-
Optionally, if you chose to use a template, to include the directory structure and files from all branches in the template, and not just the default branch, select Include all branches.
-
Use the Owner dropdown menu to select the account you want to own the repository.

-
Type a name for your repository, and an optional description.

-
Choose a repository visibility. For more information, see "About repositories."
-
If you're not using a template, there are a number of optional items you can pre-populate your repository with. If you're importing an existing repository to GitHub Enterprise Cloud, don't choose any of these options, as you may introduce a merge conflict. You can add or create new files using the user interface or choose to add new files using the command line later. For more information, see "Importing an external Git repository using the command line," "Adding a file to a repository," and "Addressing merge conflicts."
- You can create a README, which is a document describing your project. For more information, see "About READMEs."
- You can create a .gitignore file, which is a set of ignore rules. For more information, see "Ignoring files."
- You can choose to add a software license for your project. For more information, see "Licensing a repository."
-
Optionally, if the personal account or organization in which you're creating uses any GitHub Apps from GitHub Marketplace, select any apps you'd like to use in the repository.
-
If custom properties are required for repository creation, set the required properties for the repository. For more information, see "Managing custom properties for repositories in your organization."
-
Click Create repository.
-
At the bottom of the resulting Quick Setup page, under "Import code from an old repository", you can choose to import a project to your new repository. To do so, click Import code.
Creating a new repository from a URL query
You can use query parameters to pre-fill form fields when creating a new repository. Query parameters are optional parts of a URL you can customize to share a specific web page view, such as search filter results or an issue template on GitHub. To specify values for the predefined query parameters, you must match the key and value pair.
Pre-filling form fields with a URL query may be useful if you often want to create repositories with the same default settings. For example, a teacher may want each student in a class to create a repository in their personal account with the same name, description and visibility. Using a URL query, the teacher can create a link that pre-fills the repository name, description and visibility fields and share it with the whole class.
You must have the proper permissions for any action to use the equivalent query parameter. For example, you must have permission to create a repository in an organization to specify the organization as the repository owner in a query parameter. For more information, see "Repository roles for an organization."
If you create an invalid URL using query parameters, or if you don’t have the proper permissions, the invalid query parameters will be ignored and the rest of the URL will function as normal. If you create a URL that exceeds the server limit, the URL will return a 414 URI Too Long error page.
| Query parameter | Example | Valid values |
|---|---|---|
name | https://github.com/new?name=test-repo&owner=avocado-corp creates a repository called "test-repo" owned by the "avocado-corp" organization. | Any valid repository name. Spaces must be replaced with + or %20. |
description | https://github.com/new?description=An+exciting+repository&visibility=private&owner=octocat creates a repo with the description "An exciting repository" with private visibility owned by @octocat. | Any string. Spaces must be replaced with + or %20. |
visibility | https://github.com/new?visibility=private creates a repository with private visibility. | publicprivateinternal |
owner | https://github.com/new?owner=avocado-corp&visibility=public creates a public repository owned by the "avocado-corp" organization. | Any valid organization name or username. Alternatively, while signed in use @me to specify your user account as the owner. |
template_owner and template_name | https://github.com/new?owner=avocado-corp&template_owner=avocado-corp&template_name=octo-repo creates a repository owned by the "avocado-corp" using the avocado-corp's template "octo-repo". | The username of the template owner and the name of the repository template. |